Monday, May 31, 2021

Unicorn Chest and Journal

 My second project for Faith Pocock Craft Studio this month is a lovely little chest, which I  decorated and then decided to add a journal to go inside the chest.

Here is the finished project.


Here is the original kit before I decorated it.


I began by assembling the chest and then covering the lid and base inside and out with sewing pattern tissue. This provides a layer of texture. 


I made some silicone lace using lace moulds and Sellys No More Gaps.  There are some good tutorials on You Tube showing how to make the lace so I will not go into detail here on how to do this.  There are various materials that can b used in the moulds but I like the No More Gaps because once it has dried it is strong and flexible.  


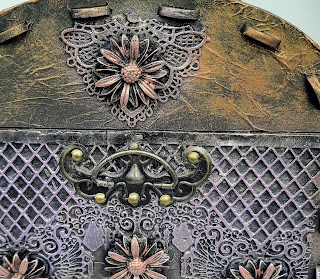
I used air dry clay in the Unicorn Head Mould and resin for the flowers, I then glued everything to the chest and painted everything with black gesso.


Once everything was dry I drybrushed the inside and outside of the chest with Lumiere Halo Pink Gold Paint.  I waited for that coat to dry and then I drybrushed the lace and flowers with Viva Inca Gold Purple Wax.

There are holes in the sides of the kit to attache dhanldes but I chose to cover the holes and added some metal handles that I had in my stash.


I attached the lock and padlock, which are part of the kit and then moved on to make the Journal. 


I used the same techniques for the journal cover.


The journal has a hidden spine. There are nine signatures of wet and dry cartridge paper sewn inside.


This chest was really easy to assemble and lends itself to all kinds of decoration.  It could be a pirate chest, a steampunk chest and would make a great gift for Christmas with a Christmas Journal or Mini Album inside,  


Sunday, May 16, 2021

Top Hat Project

 I have had a lot of fun with this kit from Faith Pocock Craft Studio. The kit makes up a top hat and is pretty awesome.  However after looking at the hat for a couple of weeks I had still had not figured out what I was going to do with it. I do like my projects to be functional if possible. So anyway finally the hat told me that it wanted  to be not a hat, but a vase.  After that everything fell into place.


I assembled the hat and then looked at standing the hat on its head and having the brim up as there was already a hole in the bottom. However I did not like the way it looked so I cut out a hole in the top of the hat. I found a black Tresemme shampoo bottle in my bathroom which fit into the hole in the hat. So after cutting down the shampoo bottle I covered the hole in the bottom of the hat with chipboard. 

To decorate the hat I glued tissue paper to the outside. This provides texture. Then I used modeling paste through a stencil to provide more texture.  I then used clay in moulds to make the pipes, taps and water droplets. I then added some of Faith's MDF cogs along with some small metal cogs.  I used an old chain around the brim and some metal nuts.


Once everything was dry and I was happy with how it all looked I used a spray primer and the sprayed with black spray paint to make sure that the black covered every nook and cranny. I left the paint to cure for a few days to make sure that everything was dry.  For the final coat I drybrushed the whole piece with Art Alchemy Steampunk paint and Brushed Iron wax 


I thought then I was finished but I put some artificial flowers in the hat vase and I did not like how they looked. I then tried real flowers because the shampoo bottle holds water but again I was not happy. So I decided to make my own steampunk flowers.  I used MDF cogs, snap fasteners, sewing pins, quilt pins, safety pins, hooks and eyes, tabs from drink cans, plastic forks, wire, upholstery pins and other bits and pieces I found in my stash aka 'hoard'. I used knitting needles for the stems and die cut the leaves from a foil roasting pan.  Once finished I sprayed them with primer and black spray paint and dry brushed them with Inca Gold and Finnabair waxes.  I think they work well with the hat vase.


I loved this project and I am grateful that Faith lets me alter her kits to fit my twisted vision of things.  Check out the fabulous kits on her site and find something that you can alter.

I have entered this project into the challenge over at the Sandee and Amelie's Steampunk Challenges Blog