
Tuesday, April 1, 2014
Imagine If Reveal
I hope you have all checked out the blog at Imagine If. Jo has revealed her latest products and her projects using them and they are amazing. Tomorrow we have the first of the projects from members of the Design Team and each day afterwards there will be something new to see on the Imagine If blog. From the Imagine If blog you can link to each of the Design Team members blogs If you haven't aready you should pop over and check out the new products at http://imagineifnz.blogspot.co.nz/. In the meantime here is a small sample from my first project to whet your appetite.


Monday, March 17, 2014
Hi everyone as I mentioned before I am on the design team for Imagine If and Fix Designs. I have received my first design team kit and an I am having a ball playing with all of the lovely product. Check out what is on offer over at the websites:
www.imagineif.co.nz/
http://www.fixdesign.co.nz/
As well as the things Jo has for sale on her websites if there is anything special, eg words, phrases or shapes you would like cut you can contact Jo and she can look at cutting them for you.The Design Team and Jo will be posting our first design team projects on Jo's blog and facebook page from 1 April so make sure you check it out then as the team have already come up with some amazing projects.
http://imagineifnz.blogspot.co.nz/ https://www.facebook.com/ImagineIfNZ
You can check out the other Design Team members on Jo's blog she has links to their blogs posted there. Such a talented bunch of ladies.
Once the projects have gone up on Jo's blog I will also post them here on my blog and on my facebook page. https://www.facebook.com/NysBiz
www.imagineif.co.nz/
http://www.fixdesign.co.nz/
As well as the things Jo has for sale on her websites if there is anything special, eg words, phrases or shapes you would like cut you can contact Jo and she can look at cutting them for you.The Design Team and Jo will be posting our first design team projects on Jo's blog and facebook page from 1 April so make sure you check it out then as the team have already come up with some amazing projects.
http://imagineifnz.blogspot.co.nz/ https://www.facebook.com/ImagineIfNZ
You can check out the other Design Team members on Jo's blog she has links to their blogs posted there. Such a talented bunch of ladies.
Once the projects have gone up on Jo's blog I will also post them here on my blog and on my facebook page. https://www.facebook.com/NysBiz
.
Wednesday, March 5, 2014
Imagine If/Fix Designs Design Team
I am so excited. I have been chosen as part of the Design Team for Imagine If/Fix Designs.
 I am really looking forward to creating some great projects with the fantastic products supplied by Jo. Our first Design Team project is due 1 April 2014 so keep an eye out on the Imagine If Blog, and my Facebook page to see what we come up with. Click on the links below to visit the blogs of the other amazing artists on the Imagine If Design Team.
Friday, February 28, 2014
I have been playing around with a little mini album that I have made for a challenge at Cheery Lynn Designs. This one is made out of cereal boxes which have been covered with tissue paper, painted and then modgepodged. I doubled up the cereal boxes to make the cover sturdier. I then used a Couture Creations Die to cut out a doily from cardboard covered with aluminium tape, which I then drybrushed with black paint. I coloured some text paper with Cranberry and Butterscotch distress ink and cut another doily which I put on top of the first doily. I then built up the cover using Cheery Lyn Steampunk Hearts and Bleeding Butterfly diecuts and other embellishments. I used glossy accents on the window pane. For a closure I used two small bull dog clips held together by a chain with a lobster clasp on one end for easy opening and closing. This is the front cover.


I used the same corner dies on the spine.

Monday, February 17, 2014
I have been taking part in an altered mousetrap swap over at NZ Paperchase. We had to decorate three moustraps and we will get three back from different people. These are my mouse
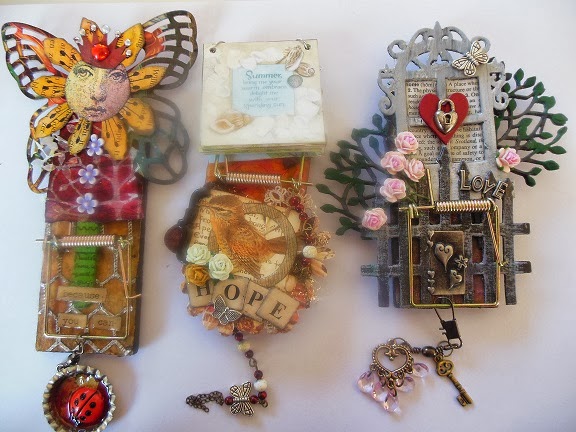
The one below is made using Memory Box and Spellbinders dies, layered up to make them stronger.
 This little art doll is my favourite.

These little ones I made a small book of quotes made out of the small pictures on the back of 12x12 calendars. The book is held in place by the spring of the mousetrap. This is one with the little book in place.

This is without the little quote book.

The one below is made using Memory Box and Spellbinders dies, layered up to make them stronger.
These little ones I made a small book of quotes made out of the small pictures on the back of 12x12 calendars. The book is held in place by the spring of the mousetrap. This is one with the little book in place.
This is without the little quote book.
Another torso made with zips, pieces of a second hand belt. buttons, doilies and puzzle pieces. This one turned out really great considering it is made from all recycled materials. The sides of the torso are covered in metal tape with wire and beads underneath the tape. The whole thing was then spraypainted black, then spraypainted with red.


Subscribe to:
Posts (Atom)