Monday, June 9, 2014

Enchanted Forest Merry Go Round

I am really excited to be bringing you the latest Design Team project from Imagine If.  Jo sent us out chipboard Merry Go Rounds/Carousels.  The Design Team have done an awesome job assembling and decorating these so please check out the blogs to see the all of the finished projects. We are doing a blog hop this month and also a giveaway.  All of them are very very different and very very gorgeous.

Jo at Imagine If has made a NZ themed Merry Go Round
Brenda has made a fun boy's Merry Go Round
Katrina has made an amazing Christmas Merry Go Round

Jo is giving away an undecorated Merry Go Round with horses to everyone who leaves a comment on the blogs.  If you want lots of chances to win enter a comment on every single blog and be in to win. Click on the rafflecopter link at the bottom of this post to leave your comments.

 As usual I have taken a walk on the dark side for my project.  I am not going to give a step by step tutorial for this project as it is too big so I will just hit the highlights.  Here is the final project made with the fantastic chipboard pieces provided by Jo at Imagine If.




The Carousel does not come from Jo with a slide out drawer I made that myself while assembling the pieces.  I thought it would be nice to add a little album so I cut out  a piece of the base and using mat board I cut sides and a back piece and glued them to the inside of the base.


I then cut a base and sides and attached them to the front piece of the base that I had previously cut away to make a pull out drawer.  I did not put a back on the drawer as the mini album is glued to the bottom of the drawer and the spine serves as a backing piece. The album opens from within the drawer.


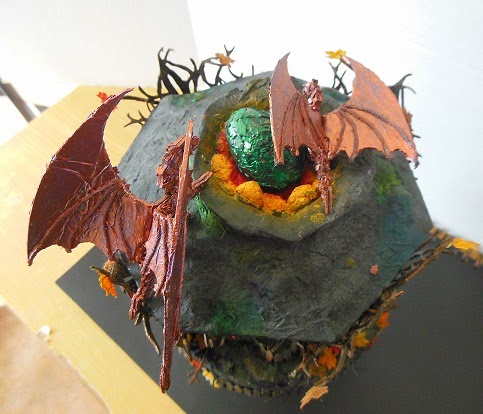
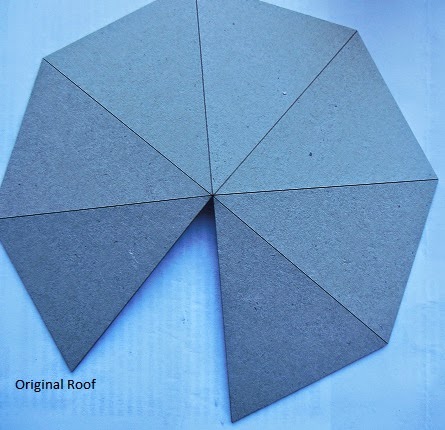
The other thing I changed was the roof of the Carousel.  If you check out the other blogs you will see that the roof comes to nice point.  I wanted dragons to nest on my roof so I cut out a circle from the top of the roof.  I then assembled the roof and put a piece of egg carton inside the hole I had made.  Using white gesso and tissue paper (the kind you use for colds) I then covered the whole roof and "nest". I also wet the tissue with the gesso and rolled it into rough balls to make the "rocks" for the inside of the nest. I also used clumps of tissue soaked in gesso to give the roof some lumps and texture.  I wanted the roof to resemble a mountain top. 


Once the gesso was dry I used various paints and sprays to colour the roof and I made a dragon egg using a plastic egg and crushed eggshell to sit inside the nest.


While the roof was drying I went on to decorate my chipboard dragons.  Firstly I painted the dragons black then I covered the wings with modge podge and tissue paper.  The tissue I used here is the type used to wrap presents not the "blow your nose" kind that I used on the roof.  This method gives the appearance of leather when it is painted and that is the effect I wanted for the wings of my dragons. I added pieces of string on the wings to make veins in the wings and set it all aside to dry.


Deciding I wanted some texture on the body of the dragons as well I glued crushed eggshell to the chipboard and when everything was dry I trimmed the wings and I painted the whole thing with metallic paint. Here you can see the "leathery" texture of the wing.


I then glued the two sides together and folded the wings to get my 3D dragons.  the great thing about the chipboard that Jo supplies is that is very easy to manipulate into shape and it does not fall apart.  Here are the finished dragons.


Once the roof was done I stencilled tissue paper with a branch stencil then wrapped it around the central pillar of the Carousel.  I then built up the graveyard around the pillar, using more of Jo's chipboard elements.  I used gravestones, an owl, bats, branches, birds. a cat and pumpkins.  I then enclosed it all in a die cut fence.


I used tissue and gesso on the base of the Carousel and then once it was painted I put it together with the roof.  I used bamboo skewers inside straws as the supports for the roof.  The straws were covered in tissue paper and gesso and then I glued chipboard trees to the front.  I punched out leaves from paper towels I have previously used to mop up excess distress ink from another project.  These I glued to the branches and dropped around the base of the tress along with bits of branches.  I then painted up some mice and rabbits, made a sign telling the unwary to keep out added a base to the whole thing, a drawer pull for the mini album and the whole piece was finished.  Whew.  Whether you want to walk on the dark side or try one of the beautiful carousels decorated by the other members of the Imagine If design team this is an amazing project and it is so easy to put together and the sky is the limit when decorating it especially with the huge range of chipboard elements Jo has available.  I urge you to check out the other blogs you will be blown away.

Till the next time, Ngaere.


a Rafflecopter giveaway

Sunday, May 25, 2014

Imagine Your Journey Hanging - Altered Film Strip Box

By now you would have seen the gorgeous film strip boxes that the other ladies have made. They are stunning.  Of course by now you have to expect that I would do something a bit different.  My daughter being a photographer wanted some "arty" photos taken while she was pregnant.  So we trundled to the beach and she posed and I took the photos.  We got some stunning photos and I wanted to use a couple of them in this project. I wanted the project to convey the natural organic feeling captured by the photos.  Here is the finished project, although the photo does not really do the project justice.


So to begin.

Here are the original pieces of the film strip, they fit together to make the film strip box.


I got a very sharp craft knife and cut up the pieces to make separate boxes.


I then took a placemat which I sanded and painted with white gesso.
 

After painting the placemat I used Modge Podge and covered the placemat with torn book pages.


Using more modge podge I covered the placemat with a green serviette and then over the green serviette I modge podged another serviette with birds and butterflies over the left half of the placemat.
 

With the placemat covered I then painted the film strip box pieces with black acrylic paint.
I also painted a few small wooden blocks I had in my stash with the same paint.


Using distress inks I inked up a dictionary page, and using stencils I added some circles using black distress ink. I then cut the pieces to fit the inside back of the box and the insides.


I then decorated the box, using die cuts, a chipboard butterfly and corner flourish.  The bird is from the Imagine If range, I used a button from my stash and a quote :Imagine your Journey".  Around the outside of the box I used some Dresden trim. I covered the outside edges of the box with aluminium tape that had been embossed and painted.  Once the paint was dry I sanded some of the paint off.


I embossed the butterfly, the bird and the flourish with embossing powder.  On the fence die cut I used crackle glossy accents.

 
I created a flower using  embossed,painted and sanded soda can metal.  Ithen cut out the flowers using the Tim Holtz tattered flower die.  I layered the flowers together to make the bloom.  I then made a few other embellishments using Coutoure Creations Dies.  I painted some of the stars from Imagine If and covered them with blue glitter.   I covered a piece of black card with black and white script tape to put behind the box.


For the photos I painted the film strips with green metallic paint.  I then used the heat tool and heated the paint until it began to bubble to give it a bit of texture. I then rubbed over the paint with gold and black rubon.


I then put the photos in behind the strip and filled in the holes with glossy accents.Using black card I made a hinge to hold both photos and glued it to the top of the box as illustrated. The photos are glued on an angle on the top of the box. I added the other embellishments and put it all together.   I hope you enjoy this project please feel free to leave comments or ask questions.  Now I am off to make something with the remaining pieces of the film strip box...........
 
Ngaere


Saturday, May 24, 2014

Owl Journal

Here is a little journal that I have made using a recycled book, manila folders and lots and lots of Imagine If products.

Here is the book before I got started on it.

 
After covering the book inside and out with scrapbook paper I then used these Imagine If materials on the covers. I loved the orange doily and thought it would look great as a moon behind the owl.  The chipboard owl I painted white and distressed with Vintage Photo distress ink,


Here is the finished cover. Isn't it kind of cute?.

 
I then cut up a couple of manila folders and folded them, inked and stamped them and added more Imagine If products to them and used them as dividers in the journal.


I then cut watercolour paper to make signatures incorporating the manila folders, inserted them into the book and used a pamphlet stitch to bind them into the cover.


I used a button off an old pair off jeans to make a handle and used a hair tie closure for the book.  This is a cute little journal with pockets and tabs, plenty of pages to write your thoughts and lots of inspirational quotes from the Imagine If "Had Enough?" quote sheet.

Materials Used

Imagine If  "Had Enough?" printed quote sheet
Imagine If Owl
Imagine If Koru Set
Fix Design Felt Monarch butterflies
Fix Design Geckos
Fix Design Card cutouts Bare Trees
Fix Design Felt Doilies
Fix Design Flying Birds
Recycled Book
Scrapbook paper
Star Brads
Watercolour Paper
Manilla Folders
Assorted Stamps and Inks
Binding Twine
Button
Hair Tie