Tuesday, April 20, 2021

Dragonfly Trinket Box

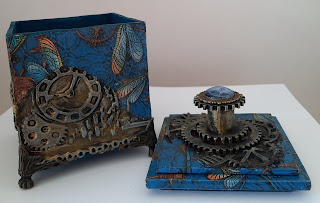
This little project is another DT project for Faith Pocock Craft Studio. This started life as an Artist Trading Block but I decided to switch it up a bit and make it into a trinket box. That is the beauty of the kits from Faith. They can start as one thing and end up as something else very easily.


I cut the tabs off oe side of the box so that I could make a lid.  To fill the gaps on the sides of the box where the tabs would have fitted I cut matchsticks to fill the gaps and then used modeling paste over the top to make the sides smooth and even.  I painted the insdie fot he box and then glued paper to each side of the box.  

For the lid I cut three pieces of chipboard slightly bigger than the box, glued them together and covered them with paper.  I did the same for the inside of the lid, cutting three pieces of chipboard smaller than the opening, gluing them together, covering them with paper, then gluing them to the inside of the lid piece.  This was to make the lid fit snugly without sliding around.  I then covered the MDF piece I had cut the tabs off with paper.

For the gears pieces I layered gel medium into a Stamperia soft mould and when It was dry I peeled it off and broke it in to pieces which I then glued to the four sides and the top of the lid.


I painted the moulded pieces with black paint then drybrushed with gold paint and Ice Blue Inca Viva wax.

To make the handle I glued together MDF cogs and a piece of dowel. This was then screwed into the MDF lid piece and this was then glued to the lid.  For the top of the handle I used a metal bezel and cabachon with a gear image. I then attached the metal feet that came with the Artist Trading Block kit.


So by cutting off four tabs the Artist Trading block becomes a sweet little trinket box that is useful and decorative.  Dont be afraid to modify and experiment with these kits.  


Sunday, April 11, 2021

Dragon Book Box and Journal

 This is a design team project for Faith Pocock Craft Studio.  Faith sent me a couple of book boxes to play with.  


These book boxes have a flexible spine and locking mechanism to keep the box closed.  I chose to not use the locking mechanism on this book box opting to use a an old leather belt as a closure instead. 

I covered the entire box with tissue paper and then I glued calico to the outside of the spine to give it a more durability without removing the flexibility.  I then used air dry clay for the dragon and the filials.  I added some metal corners and some hitches for the closure. I added a metal handle and some red half gems to finish the front.


For the back of the book box I used modeling paste through a stencil. I added the leather belt pieces using metal filigree pieces and decorative brads.

The front and the back were painted black and then drybrushed with red paint and gold wax.

For the three sides of the book box I used modelling pasted and then dragged a fork through the paste while it was wet to give the effect of book pages. Once the paste was dry I painted the edges with brown paint and vintage photo ink. I then added gold to the edges.  


The inside of the box was lined with printed paper and I used a page from an old calendar on the inside lid of the box.  I added a piece of metal filigree and a brad.


To go inside the book box I made a journal. I used covers from an old book, covered them with tissue paper and glued another calendar picture to the front, 


To get the look of scales I glued eggshells to the cover and around the picture ont he front cover.  I then painted the eggshesl with black gesso and then used the same paints I used on the book box.


I made my own hitches for the closure using brads and eyelets.  I glued these into place and then I added a gem to the front of the cover.  On the back I sued brads and metal filligree pieces.  I used more brads to secure the leather belt in place for the closure.


I then dyed the paper for inside of the journal. The paper is a mix of 130 and 200gsm paer with four signatures with eight full pages in each signature.  I used a hidden binding system and decorated the spine using metal filigree and brads.


Thank you for reading this and I hope it has inspired you to try something similar.