Friday, November 11, 2016
Trashy Junk Journal Swap
I have made my first video showing a signature I made for a swap with some amazing ladies over at Trashy Junk Journals a fabulous Facebook group I am part of. It is not the greatest video but hopefully I will get better as I practice. The signature ended up being fat as I just kept thinking of more things to put into it. There are lots of flaps and pullouts and tags with jurnalling posts and lots of room to journal and add things of interest to the signature. There were five of us in the swap, each making a signature and the idea was that we would bind all five signatures into one journal The signatures I received were amazing and I am still trying to think of an effective binding method that will do them all justice.
Monday, October 10, 2016


Green Torso
This plaster torso is a commission piece I have made. It is not the usual colours I would use but the person specifically requested greens. I do like how it has turned out.


The butterfly also came in a bunch of flowers. The flourishes are die cuts made from recycled card, layered up to give them strength and then painted.


I covered the torso with old book pages then podged green serviettes over the top of the book pages.
Then using Powertex I added the crocheted doily and the lime green fabric to give it texture. The green "fabric" was a piece that hade come wrapped around some flowers I had received for my birthday.
I then took some $2 Shop flowers and altered them using Powertex, paints, sprays and glass glitter.

The butterfly also came in a bunch of flowers. The flourishes are die cuts made from recycled card, layered up to give them strength and then painted.


The photos don't do justice to the flowers, they are all various shades of green.
Sunday, October 9, 2016
Arachnae - Lady of Spiders
Here is a little project that I had a bit of fun with. I took a childrens doll that I found at a thrift shop, added s skull, some spiders and a sword, then wrapped her in powertex soaked cloth. I covered her face with a mask that I found at a garage sale and here she is.


Angel Emergent
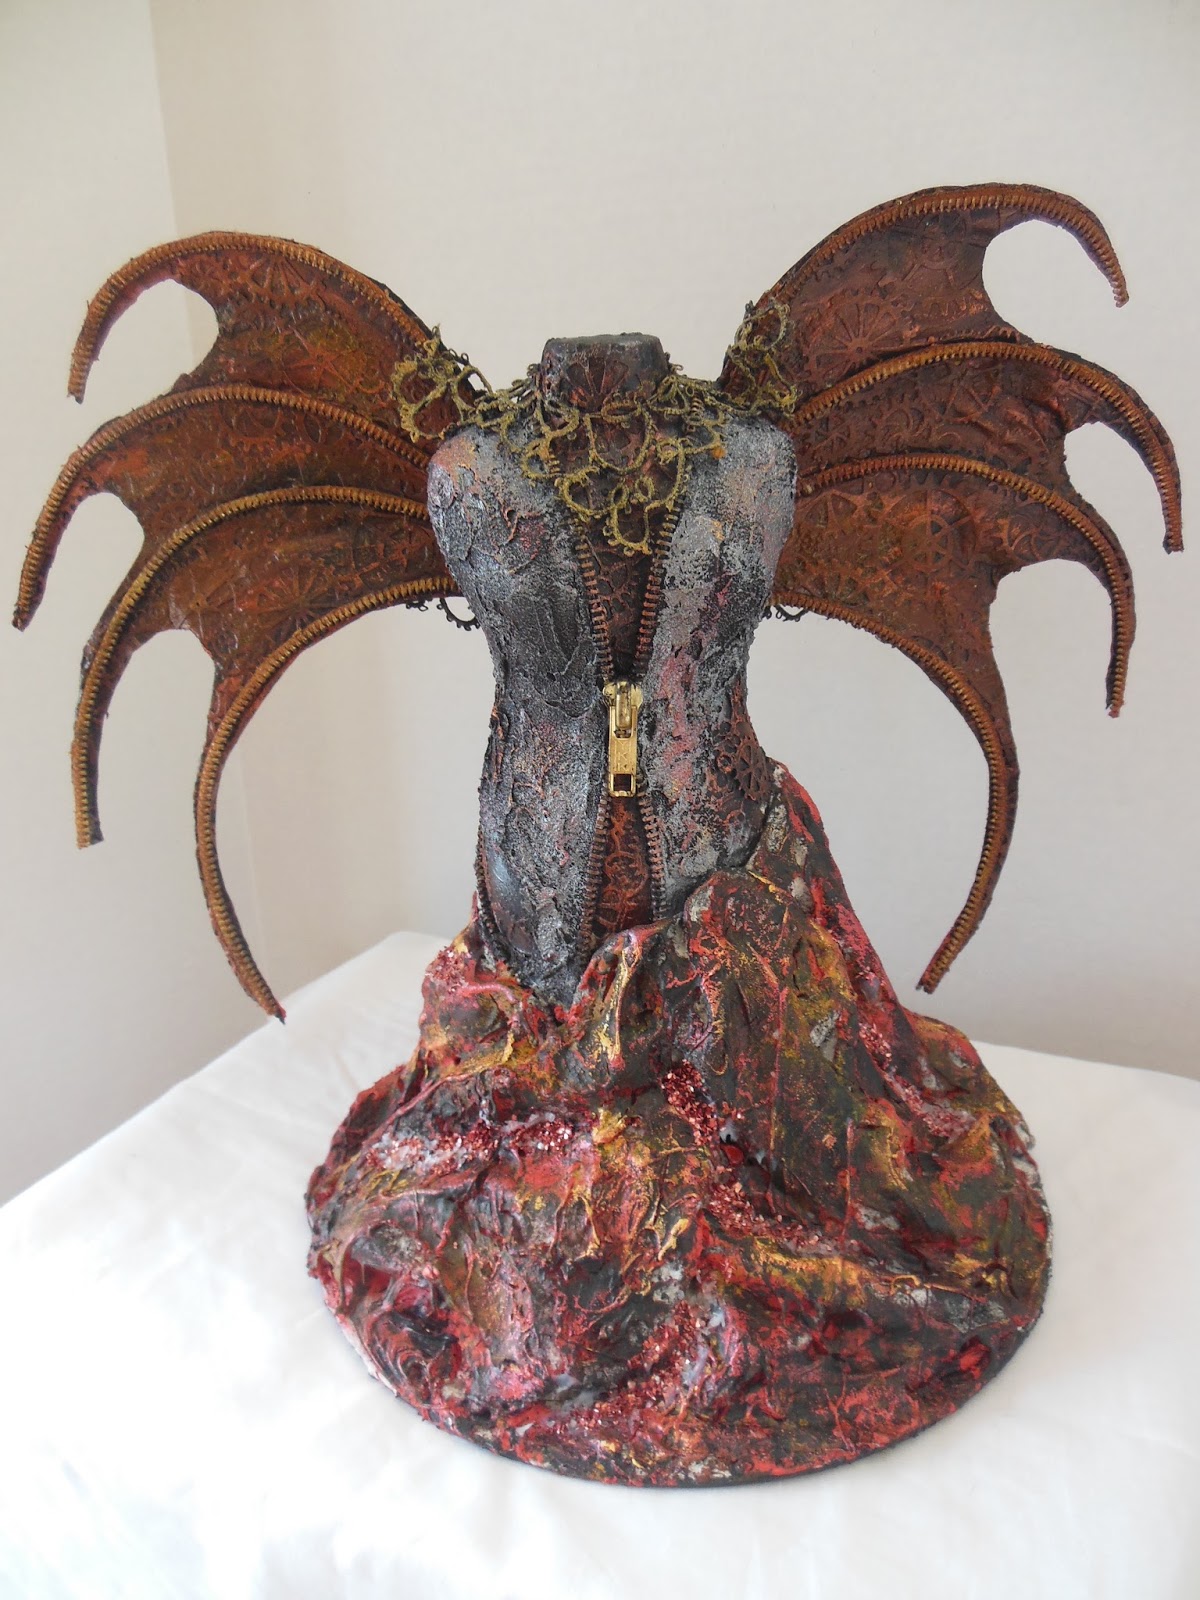
Finally I have had time to have a play and I have altered another paper mache mannequin. I love making these they are so much fun and they always seem to take off in their own direction taking on a life of their own.
 To begin I painted a paper mache mannequin form with black gesso. I then glued gear diecuts randomly on to the body and then framed them with recycled zippers. Once dry I drybrushed the gears with copper Lumiere paint. I then mixed pumice gel with texture past and black paint and then used it cover the rest of the body.

I wanted the effect of the mannequin being trapped in stone, so I used black Powertex and calico which I draped around the lower body.
To add to the stone illusion I added some Powertex Stona art and once it was dry I dry brushed the whole thing with a mixture of grey and silver metallic paint.
While the body was drying I made a pair of wings. These were made using a wire armature and masking tape and tissue paper. I layered gear diecuts over the wings then painted them black, then painted them with Quinacridone Gold paint. Once dry I drybrushed them with copper Lumiere paint, added a little rusty paper and then a hint of Ferro gold paint. I glued zippers to the "veins" in the wings which I think gives them an awesome look.


I added a crocheted doily dipped in Powertex and then drybrushed with metallic paint.


 To begin I painted a paper mache mannequin form with black gesso. I then glued gear diecuts randomly on to the body and then framed them with recycled zippers. Once dry I drybrushed the gears with copper Lumiere paint. I then mixed pumice gel with texture past and black paint and then used it cover the rest of the body.
I wanted the effect of the mannequin being trapped in stone, so I used black Powertex and calico which I draped around the lower body.
To add to the stone illusion I added some Powertex Stona art and once it was dry I dry brushed the whole thing with a mixture of grey and silver metallic paint.
While the body was drying I made a pair of wings. These were made using a wire armature and masking tape and tissue paper. I layered gear diecuts over the wings then painted them black, then painted them with Quinacridone Gold paint. Once dry I drybrushed them with copper Lumiere paint, added a little rusty paper and then a hint of Ferro gold paint. I glued zippers to the "veins" in the wings which I think gives them an awesome look.


I then painted the torso with Lumiere pewter paint and attached the wings. I used Powertex Flex on the bottom of the torso and then painted it with various acryclic paints and added some Glass glitter to give it a bit of sparkle. The concept is the angel emerging from the hot melted stone.


I added a crocheted doily dipped in Powertex and then drybrushed with metallic paint.


Saturday, October 1, 2016
Torsos
Here are a few more torsos that I made for my exhibition.
 This torso is a small one made from a paper mache torso that I had brought in Spotlight. It is covered in die cuts then coloured with acyrclic paints and Viva.
The second torso is a full size paper mache torso covered in burlap that has been soaked in Ivory Powertex. It is mounted on a large canvas. I frayed the edges of the burlap to give it a more organic look.


The second torso is a full size paper mache torso covered in burlap that has been soaked in Ivory Powertex. It is mounted on a large canvas. I frayed the edges of the burlap to give it a more organic look.


The next two torsos were made using a plastic torso. I covered the torso with tissue paper and painted the tissue paper. I then used crocheted doilies soaked in red Powertex and transparent Powertex to cover the torsos.


These two are small paper mache torsos. One is covered in diecuts using the same materials and paints as the larger plaster version and on the second one I used, zips, powertex and lumiere metallic paints.


Monday, August 22, 2016
Masks
As part of my exhibition at the local gallery I have made a series of masks. I really had a good time making these and I love the way they have turned out.


First up is the Forest Mask. This is made with die cut leaves and a little nest and eggs in her hair. The markings on her face are made with eggshells and gems that were painted.
Next is a mask made with Powertex, fabric, nuts and bolts and gears and finished with Finnabair rust paste.

Another mask was made to look as if it was coming out of a stone garden wall.

Then I made one with crocheted doilies, Powertex and Art Alchemy paints.

Lastly I made a steampunk mask which I had previously made as just a mask. Then I added the canvas background

Thursday, August 18, 2016
Southern Girls Anything Goes - Lady of Threads
Well this is another Anything Goes challenge. I have been kept pretty busy working on pieces for an exhibition at my local Art Gallery. Here is one of my favourite pieces from the exhibition that certainly fits the theme at Southern Girls this month. The project is a mannequin that I have decorated. I call her Lady of Threads.


I wrapped the neck of the torso with a measuring tape and added buttons around the bottom of the neck for interest. I cut the ends off a cotton reel and glued them onto two packets of pins, which I then glued to the front of the torso. I added a dome and the end of a decorative pin to the top of each cotton reel.


I covered the torso with the instructions from a dressing pattern, then I covered that with the actual pattern tissue paper. While the paper was still wet from the glue I wrapped around and around the torso with different coloured cottons.
I used powertex on the zip and wrapped it around the torso' hips. On the top of the shoulder I glued self covered buttons that I had covered in the sewing pattern instructions, topped off with a dome and quilting pins. I used domes running from the torso' chest up to the edge of the "arms" and underneath those I glued a lot of safety pins to get the "fringe" effect.

I wrapped the neck of the torso with a measuring tape and added buttons around the bottom of the neck for interest. I cut the ends off a cotton reel and glued them onto two packets of pins, which I then glued to the front of the torso. I added a dome and the end of a decorative pin to the top of each cotton reel.

Under the breasts of the torso I glued hooks and eyes and down the front I glued sewing machine bobbins. On top of each bobbin I glued a dome and a decorative pin.


I hope you enjoy this project as much as I enjoyed making it and please pop over to Southern Girls and check out what the rest of the design team have come up with.
Subscribe to:
Posts (Atom)