Tuesday, March 31, 2015

Sewing Album

This is my last post as a member of the Imagine If Design Team. It has been an amazing journey and I have enjoyed creating with the fabulous products Jo has available and I have learnt so much from the other fabulous team members.  It has been a great year but as Jo has already explained she is making changes to the way she does things.  I am looking forward immensely to the monthly challenges and can't wait to see what everyone comes up with.  

For my last project I have made an altered book journal using some of Jo's stencils as masks and some of her gorgeous chipboard dress forms and dresses.


To begin I covered an old book with gesso, then glued white sewing pattern paper over the top.


Using the cutouts from the stencil as masks I then painted the whole thing black.


I then covered the dress form and the other chipboard dresses with scrapbooking paper.
I used the dress form on the cover and the other dresses inside the album. I also added a pair of chipboard scissors and other sewing related embellishments to the cover.


I covered the inside of the album with brown sewing pattern paper and used the envelopes the patterns came in to make page dividers.  I glued a chipboard dress to each divider.


I used a tape measure as a bookmark and created other pages using pattern papers and pieces.with tags, pullouts and flaps for journalling.


I made a charm using a pice of tape measure, a bobbin, a thimble, hooks and eyes, buttons, a scissors charm and a small cotton reel which I added to the spine using a covered button to anchor it all,


I hope everyone has enjoyed the journey with all of us on the Design Team.  I will miss the fabulous ladies who have been on this journey with me they have been supportive and inspiring and I wish them all the best for the future. I would like to thank Jo for her generosity and her faith in me when I headed in a different direction with some of my projects. While this is the last project I will be making as a Design Team member it will not be the last project I make using the fabulous products from Imagine If.  I look forward  to the challenges Jo will be hosting and I would like to say thank you to everyone who commented on my projects your positivity and praise makes it all worth while.  I am also looking forward to SENZ this year as I will be taking two classes and the projects are going to be amazing.

Saturday, March 21, 2015

Beneath the Sea

Here I am again with another project for Imagine If.  For this project I have used one of the new Mermaid art dolls from Jo's new product range.

The project is a decorated tin which began live as a container for a bottle of spirits.  I covered the container with white gesso, then I added some green and blue metallic paint and while the paint was wet I covered it with glad wrap.  Once the paint had dried I removed the gladwrap.  I then decoupaged some images from a calendar onto the container.  I decorated the art doll and added some netting and shells to the top of the container.  I also added some seaweed, fish and shellfish from Imagine If. then I glued the doll around the container.


Thanks for dropping by to see this project and feel free to leave comments or questions.  Until next time. 

Friday, March 13, 2015

Exploring Texture

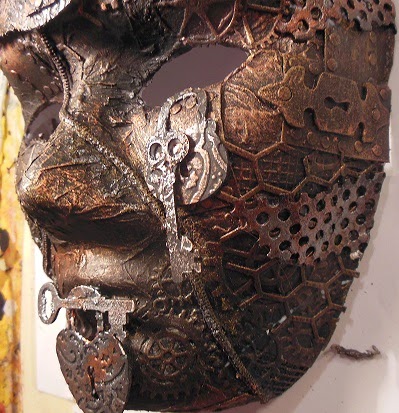
I have always loved projects that have a lot of texture on them and over the past few weeks I have been exploring different ways of getting more texture into my projects using the chipboard pieces from Imagine If. I thought that I had explored it enough but there was still another project in me so I decided to make a mask as a change of pace.  Here is the finished piece.


And here is the process.

Take one blank mask and some chipboard peices, in this case wings, keys and padlocks from the new range at Imagine If.  Rip a few holes int he mask then paint everything with black gesso.


Once the gesso is dry add some mesh tape and some masking tape over the mask in places.  At this point the mask looks more like an accident victim than a piece of art.


Glue some diecut gears on the inside of the tears in the mask, then glue tissue paper over the back side of the gears.


Add more gear diecuts  (Memory Box) over the front of the mask. It doesn't matter what colour card you use as it will all be painted black. I also added strips of black card to make it look like steel plates. the rivets are circles punched out black card and added after the paper strips were glued down.  


Then because I wanted more texture I added pieces of chicken wire diecut (Cheery Lynn)
over what I had already added to the mask.


It looks pretty rough at this stage but it will get there in the end.  I added the teeth from a zipper and I painted everything with black gesso.  I embossed the chipboard and dry brushed it with Viva Inca Copper and Lumiere Pewter and assembled the pieces.  I drybrushed the whole mask with the same paints and added a little Ferro gold.  I then glued on the chipboard pieces and the mask was done.


Hope you enjoyed this project. 

I am entering this project into the challenges at:


Thursday, March 12, 2015

Southern Girls Design Team challenge - Boys theme- Mar 2015

For the challenge over at the Southern Girls Challenge blog the theme is "Boys".  So having got really behind in my scrapbooking for my new grandson Olley I decided to do a mixed media layout of him playing with bubbles.  Here is the finished project.


I gessoed a piece of patterned paper then I cut another piece of paper into different sized rectangles and layered them in the centre of the page.  I then gessoed over them.  Then I stamped circles with acryclic paint, used gel medium through a bubble stencil, stencilled through a piece of sequin waste and used bubble wrap to make more bubles.  I then splattered a slightly darker paint using a toothbrush.  I stuck the photo to a piece of scrapbook paper and distressed the edges.  I then adhered it to the page.  To finish off I printed out some words and I outlined the page, the words and the rectangles of paper with blue watercolour crayon and then I added some clear domes to keep in with the bubble theme.  I hope you will join us over at Southern girls Challenge and look forward to seeing all of the wonderful entries.