Sunday, December 30, 2018

3Quarter Design Team Projects - Imagine If NZ

I have been extremely busy this year with work and with teaching classes at SENZ and FYI adt shows here in New Zealand.  I have also been making projects for Imagine If using their new 3Quarter Design kits. You can see the full range of kits on their website 3Quarter Design kits.  

These kits have been out together using high quality paper and chipboard. The first two projects I made using the Mechanical Melange collection. 


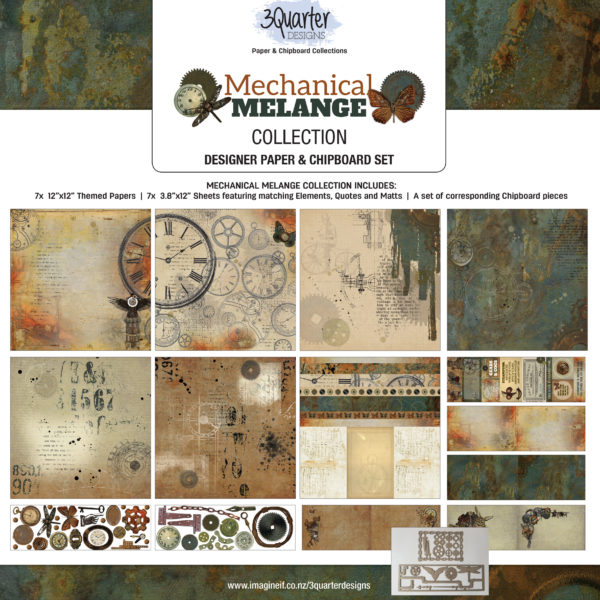
This kit contains the following:

  • 7x Printed Single sided 30.5cm x 30.5cm or 12x12inch themed Papers
  • 7x Printed Single Sided 30.5cm x 11cm or 12x 3.8inch Strips featuring matching photo matts, borders and additional elements that can be cut and layered
  • An assorted collection of coordinating Imagine If chipboard pieces
  • The back cover of the kit includes some large photos of a set of 5 scrapbook pages that have been created using the collection
The first project I made was a covered ring binder.  I used stencils, stamps, embossing paste, and inks on the front covers, the spine and back cover.  

I then made a collage using a piece of corrugated card, some of the chipboard piece from the collection which I painted and inked to give a rusty look, some metal cogs and a cabachon to finish it off.  I also used a quote from the collection.


Front Cover


Back Cover and Spine

On the inside covers I glued paper and created pockets. I then created three dividers with a pocket on each side, using the various printed strips and elements included in the collection.


Front Inside Cover and Divider


 Dividers


Divider and Back Inside Cover


The second project using this collection is an art journal made from an old book cover and utilises the chipboard elements from the collection.

I covered the book cover with tissue paper, which I painted brown.  I then stamped the cover with various texture stamps. I then used gel medium through a stencil to give more texture.
I painted and ahdered the chipboard.  I then created signatures from wet and dry cartridge paper and various weights of watercolour paper which were then sewn into the book cover.  


The next project is made using the Past Treasures collection.


  • 7x Printed Single sided 30.5cm x 30.5cm or 12x12inch themed Papers
  • 7x Printed Single Sided 30.5cm x 11cm or 12x 3.8inch Strips featuring matching photo matts, borders and additional elements that can be cut and layered
  • An assorted collection of coordinating Imagine If chipboard pieces
  • The back cover of the kit includes some large photos of a set of 5 scrapbook pages that have been created using the collection .
Gift Baskets/Bags


The last project is another ringbinder made using the Enchangted Kingdom collection.


  • 7x Printed Single sided 30.5cm x 30.5cm or 12x12inch themed Papers
  • 7x Printed Single Sided 30.5cm x 11cm or 12x 3.8inch Strips featuring matching photo matts, borders and additional elements that can be cut and layered
  • An assorted collection of coordinating Imagine If chipboard pieces
  • The back cover of the kit includes some large photos of a set of 5 scrapbook pages that have been created using the collection
Ringbinder


Monday, August 6, 2018

Gothic Book Box and Book

This project began as a plain paper mache book box.  The theme for the Imagine If stand at SENZ this year was books.  Jo sent out a box and we agreed that my theme would be "Gothic".  This project had me stupmped for quite a while but in the end I came up with a concept and ran with it. Here is the front of the completed project.  


To begin with I painted the whole box with black gesso and then I covered the front of the box with white crackle paste.    I then played with green and blue paint and DecoArt Quinacridone Gold over the whole box. I used black embossing paste on the front cover and once that was dry I added various paper clay pieces made using the IO moulds. The skull is a plastic one that I picked up from Spotlight and I used Powertex and a croicheted doily to put around the skull.  I also used the large and small balls from Powertex to add texture to the doily and around the paperlcay pieces.  I painted the paperclay with black gesso then I used Viva Gold and DecoARt pastes to give them an tarnished tinge.  I also used DecoArt Quinacridone gold around the paperclay pieces to tie them into the rest of the cover.


For the back and the spine I used silicone lace made using a lace mould and added more paperclay pieces painting them using the same paints I used for the front.


On the side of the book I used white modelling paste and dragged a fork through it to stimulate pages.  I used vintage paper distress stain to give it an aged appearance.


On the inside of the box I used some beautiful papers that I downloaded from OriginsDigitalCurio at Etsy. I also used an image from a calender by Victoria Frances. Over the image I painted crackle glaze and then I stencilled some black embossing paste to match the cover and used the same paints that I used on the book box to tie it all together.  I also added some silicone feathers.


Once the box was completed I then made a book to go inside the box,  Again I used an image from the calendar by victoria Frances and distressed it and added paperclay elements.  I hand dyed the paper inside and ripped the paper to give it an old worlde look. For the spine I again used paperclay pieces from the IO moulds and then I added a cabachon and some beads to hang from the top of the spine.  I used a hidden binding to sew the signatures into the book.


Thursday, July 5, 2018

Grunge Dreamcatcher

Here is a project that I designed for a class I am teaching at SENZ this year.  The dreamcatcher is primarily made of chipboard and metal embellishments from Imagine If NZ  

I am entering this project into the challenge over at SanDee and Amelie's Steampunk Challenge


Monday, June 11, 2018

More Dyeing

Had some fun this morning eco dyeing using autumn leaves and iron mordant and also tried my hand at rusting paper.  Love the results. 


Sunday, May 6, 2018

Dyed Paper

I have made a small coptic bound bound using some of the paper that I had dyed previously. I covered the book with some of my eco dyed paper.


 I have also been dyeing more paper using my doilies and shelf liners to create patterns on the paper.


Then with the leftover dye liquid I coloured paper bags and other paper that I had to hand.


I have also been experimenting with dyeing paper using food colouring.  Here are the results, gorgeous vibrant papers.