Monday, November 2, 2015

Imagine If DT Project - Journal Pages

This project for Imagine If is a bit different to the others I have done recently.  I am not sure if many of you know that in addition to her wonderful chipboard products Jo also sells stencils.  So I decided to complete a project using some of these gorgeous stencils.  I am currently taking part in an art journal swap.  This is the first time I have really tried art journaling and I must say I am loving the creativity of it all.  Here is the finished page.


The theme for this page was a song or video. I chose the theme song from Disney's Pocahontas.

To begin I used the bleeding tissue technique on the background.  This entails wetting the pages and then laying down pieces of tissue paper and then wetting them again.  The dye in the tissue remains on the page when the tissue paper is removed. It has given a pretty soft colourful effect which is what I was trying to achieve.  I also coloured another piece of watercolour paper using the same technique. 

I then took a large Faces stencil from Jo's collection and using textured paste coloured with black paint I stencilled the face on to a calendar page. 


 In the movie when Pocahontas is singing the song her hair blows back and becomes intermingled with leaves and other bits and pieces.  This is the look I was striving for.

In the background I used a piece of textured paper to stamp "mountains" and then I used another stencil of Jo's which has a variety of trees and branches on it to stencil fir trees onto the background.


Once the background was done I glued the face down to the page and then I ripped up the extra watercolour paper into strips and began gluing them around the face. 


Then using the Tree stencil I stencilled some branches into her hair.  I stamped some leaves and some swirls and added the line from the song, coloured her lips and eyes and I was done.


Pop over to the Imagine If website and check out the wide variety of stencils that Jo has to offer.  They are so versatile and can be used for so many projects. 


Facebook Secret Art Journal Swap

I have been taking part in an art journal swap with other talented ladies here in New Zealand. We each chose a theme, mine was inspiring quotes and I asked for some texture on the page. Boy did they deliver.   It has taken almost 10 months and I finally got my completed journal back.  I am thrilled to pieces with it.  The artwork I have received back is amazing and the ladies have put so much thought and time into each page it is humbling.

To begin here is the cover I made for my art journal from an old book.  I also used the book pages glued together to make my art journal pages.


We also had to make the first double page spread in our journals. Here is mine:

 
Now on to the gorgeous pages I received from:
 
Louise
 
 
Brenda


Fiona


Frances
 
 
Joan
 
 
Karen


Kath


Paula


Sonya


All of the pages I received back are just stunning and I am so happy I joined the swap.
 
Here are the pages I made for my swap partners.
 
 
Here is the page I made for Paula whose theme was "In My Garden"


Paula also asked for an extra page showing our garden. since I don't have a garden to speak of I did a page representing my dream garden.


This page I made for Fiona


The next page I made for Brenda.


Here is Karen's whimsical page:


I loved this page with the Tim Holtz birds I made for Kath.


For Sonya's pages I tried my hand at a Teesha Moore style page.


Joan's pages were about taking the time to....

 
Frances' theme was"Anything Goes" and I found those to be the hardest pages to do. Too many ideas in my head until they settled down and I decided on this:
 
 
And last but not least, Louise's pages. Her theme was a movie or a song and I chose this one:


This was a fabulous a swap to take part in and the fact that we all kept in touch via a Facebook page set up for the swap made things so much better and kept us all focused and interested especially with the sneak peeks that kept popping up.  I would thoroughly recommend a swap like this for people just beginning in art journaling and those who have more experience.  I have learn't so much through this process and it has pushed me to try things that were outside my comfort zone.   Now I am off to get ready for the next swap.

Tuesday, October 27, 2015

A Tale of Three Tags

Today I have a project to share using the fabulous chipboard products from Imagine If .
I have made three tags using pieces from different sets of chipboard which can be found on the Imagine If website or in the store.

Here are the tags:

 
And here is how I made them:
 
Halloween Tag
 
 
Imagine If Chipboard Products Used:

Imagine If Set of cats
Imagine If Halloween Set
Imagine If Bats and the Moon
Imagine If Chipboard Tag
Imagine If Fence
Imagine If Quote Sheet


I began by painting all of the pieces including the tag with black gesso.  I then covered the tag, the cat, the bats, and the gravestones with tissue paper and then painted them again with black gesso.  This gives a bit of texture to the pieces.  Whole they were drying I painted the pumpkin. I painted a piece of book paper with yellow paint and put it behind the pumpkin to give a lighted effect for the eyes, mouth and nose. 

 
 I painted the gravestones with grey paint and a little green to simulate moss on the stones.
The fence I sponged with brown paint.  The tag I painted with blue paint on the top and green on the bottom.  The fancy piece at the top of the tag I painted with gold paint.  Using my Gelli plate I made a print and cut out a circle for the moon.


Once everything was painted I put it all together with the quote.


I added a piece of bush left over from a die cut I used on the Castle tag, gave the cat a lighter chest and belly and some eyes and added some stars and it was done.

Mushroom Tag


Imagine If Chipboard Products Used:
 
Imagine If Large Mushroom with grass
Imagine If Ladybird
Imagine If quote sheet
Imagine If Chipboard Tag


For this tag I painted all of the pieces except for the ladybug bodies with white gesso.  The ladybug bodies I painted with black gesso. I used tissue paper on the body of the tag, the mushroom and the mushroom cap to give texture to the pieces.  I then painted the pieces.


I used some coarse texture gel and paint mixed together for the flowers on the top of the tag and added some crackle texture paste and book paper to the tag.


I then used Brushos to colour the tag.  I sprinkled Lemon, Leaf Green and Orange on to the tag and then I sprayed it with water. I did the same with the quote.
 
 
Then I assembled all of the pieces.


Castle Tag
 
 
Imagine If Chipboard Products Used:
 
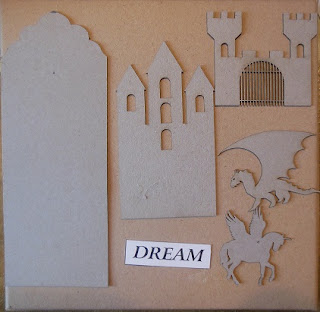
Imagine If Castle
Imagine If Dragon
Imagine If Flying Unicorn
Imagine If Chipboard Tag
Imagine If Quote Sheet


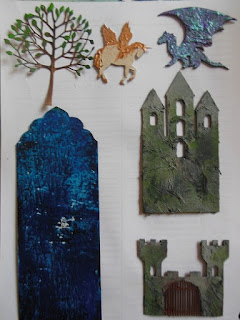
To begin I painted all of the pieces except the Pegasus with black gesso. The Pegasus was painted white. As with the other tags I covered everything except the Pegasus with tissue paper.
 
I then painted all of the pieces.


I added a die cut tree to the wall of the castle and paper behind the windows.  I painted the background dark blue and added a circle for the moon.  I used an Imagine If stencil for the cloud and added some stars to the sky. I coloured the quote and put it all together.
 
 
I am not sure if I will put these on frames or make them into magnets yet but either way they are lovely little keepsakes. I hope you enjoyed this project and I hope it inspires you to create your own projects. 


Thursday, October 22, 2015

Southern Girls Challenge - Stripes

The new challenge over at  Southern Girls Challenge  is Stripes.  For my project I decided to make an altered canvas.


I am trying to use up things in my stash (some call it my hoard) so I decided to recycle a canvas I had lying around and for the cardboard I recycled some empty tissue paper boxes.


I began by covering strips of card with aluminium tape and then I ran them through different embossing folders using my Cuttlebug.


I then painted each stripe with a different colour of acrylic paint.  Once the paint was dry I sanded it back on each stripe.


I painted a 6x6 canvas with black gesso and when that was dry I coloured course texture gel with black paint and covered the front of the canvas.  I then placed my striped over the top of the gel leaving a small gap between each stripe.


I really love the effect. I think it looks pretty cool.  I would be happy to leave it like this but the argument could be made that it  needs a little something....

I covered some silk flower petals and a doily with black Powertex and combined them to make a flower.  Once it was dry I dry brushed the edges of the petals with gold paint.  I glued the flower to an old Christmas ornament I had put away in case I found something to use it on.  I then die cut some circles and flourishes from recycled card covered in aluminium foil. I painted them black then dry brushed them with the same gold paint I used on the flower. I then assembled them on the canvas.


I like the way it has turned out and I hope it has given you some ideas that you can use on a project of your own.  Pop over to the blog Southern Girls Challenge and check out what the rest of the Design Team have done and enter your own project into the challenge.  Until next time, happy crafting.