Tuesday, August 5, 2014

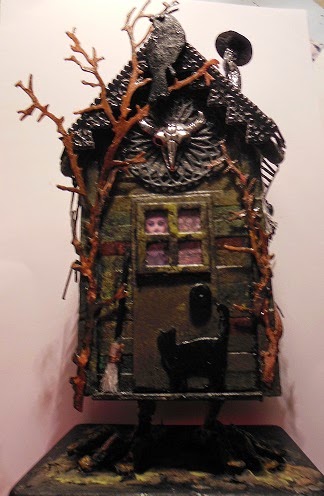
Mini Baba Yaga House - Version 2

You may remember a short time ago I completed a project using an MDF house from Imagine If that I called the Baba Yaga House.  Check out the original house here.  Well I had such fun making the first house I wanted to try making a smaller version. Using a small gift box I glued the lid of the box to the base and then I cut the top of the box into a roof shape.  Using another gift box I I cut the corner on the join to make the roof and I glued it all together, decorated it, cut a hole in the back and made drawers, glued the whole thing to a coaster and ended up with this version.  I used a lot of the same techniques on the smaller version that I had used on the larger version eg I added drawers in the back, I used popsicle sticks to get the weathered wood look and I used embossed metal tape for the roof. This version is about half the size of the previous version and is pretty cute.  I am really pleased with how it turned out and now I am going to try a good fairy version of the same thing.  Here is the finished project.


Looking around the internet I have found a few neat challenge sites that I am playing along with, so I am entering this project in the challenges at:


Sunday, August 3, 2014

Time to Live - Imagine If Design Team Project

Welcome back to our newest blog hop. I really hope you are enjoying the projects that Jo and the wonderful team of ladies have been bringing you.

Our blog hop begins as usual at Jo's Blog at Imagine If and you can follow on from there or you can check out Carol's creation and work backwards from there or you can jump to Brenda's project and follow on through the rest of the blogs.  Again this week there is a prize made up of 2 packets of Jo's amazing felt flowers.  These flowers are so versatile they can be used as embellishments or they can be shaped into beautiful 3D flowers. (see my post How Does My Garden Grow).

On to this weeks project:


A little less dark than some of my latest projects, but that is the great thing about Imagine If's products there is something for every style of crafting. 
 
When my kit arrived for this month I found all of these gorgeous goodies. Isn't the clock just stunning.  It would look great on a 12x12 scrapbook layout but that is not the road I wanted to take. 


The windows above come in two pieces, the frame itself and a backing sheet  measuring 12"x12".  Both are made from MDF.  I wanted to use the clock and I wanted to use the frames. My first thought was to hinge the MDF and make a layout book, but I had already done that on my last project It's All About Olley.  This could be made into a similar book so easily but I digress.  I thought about putting photos in the frames which would also have been a great idea, but I wanted to incorporate the clock and I wanted it to be seen so I decided not to add in photos.  I wanted to use all of the elements shown above and I wanted the project to have some depth and I wanted to showcase the clock.   So here is what I decided to do.  I painted the chipboard clock with caramel paint, then I added a layer of crackle medium and when that was ready I sponged on raw umber paint to give the aged rusty look. 
 
 
While the clock was drying I modgepoged a sheet of  K and Company Daffodil Glitter Paper  on to the sheet of MDF.  Just a tip when modgepodging or glueing paper onto another surface, using your paintbrush put the medium all over the back of the paper first using a crosshatch pattern, this stretches the paper slightly, then apply medium thinly to the other surface and apply the paper working out air bubbles using a cloth (a bit like wallpapering) or a roller.  This prevents air bubbles and creases that can occur when putting a dry surface on to a wet surface. 
 
The next step was to paint the MD frame with yellow ochre paint and when that was dry I again used the crackle medium and a top coat of green acrylic paint, sponged on to give a softer look to the finished crackled effect.  I sealed the clock and the frame with a mineral sealer.  If you try to seal crackled paint with a water based sealer it will cause all of your crackles to disappear.  I painted the birdcage the same way using raw umber and warm white paint.  The trellis I cut into two pieces and painted with the caramel paint and finished off with raw umber dry brushed over the top to give it a more rustic look.
 
I then began to assemble the pieces on the frame.  I didn't want the pieces just sitting flat so I bent the birdcage so that is curved out over the frame.  The beauty of the chipboard that Jo uses to make her pieces is that it is strong enough to manipulate in this manner.


I then kept adding elements until I was happy with the overall look. I glued the frame to the backing and then added the other elements on top of the frame to get the 3D effect I wanted.  I diecut what felt like hundreds of leaves, sprayed them with ink and then screwed them up while wet then let them dry a minute and opened them out to give a more realistic effect.  I glued these to bare branches, also a diecut and added small diecut flowers in the same tones as the backing paper.  I extended the sign so it reached to the top of the frame and I added red dyed baby muslin to the bullrush heads to give a more organic touch.The signpost and fence I painted with black paint and then drybrushed silver over the top.  The little dragonfly is a chipboard piece from Imagine If and the ladybirds are diecuts. I also curved the fence lightly before glueing it in place.


I have purposefully left areas of the clock uncovered. I wanted the clock to draw the eye in and around the piece and I think I have achieved that. 
 
One again thank you for visiting my blog and I hope I have inspired you to try a project like this for yourself. 
 
Don't forget to visit the blogs and leave comments and be in to win that fabuous prize from Imagine If.


a Rafflecopter giveaway
Two New Torsos

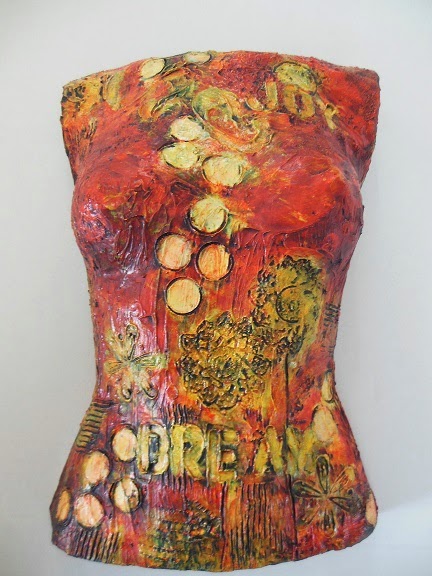
Finally got these two torsos finished.
I love the simplicity of this one.  The map and the birds give it a light airy feel.


This second one is simple but there is a lot going on.


I am going to have start rehoming some of these as I am running out of wall space but they are so addictive.

Thanks for looking be back soon with more projects I am finally getting finished.


Sunday, July 27, 2014

Altered Coaster Art

Sue over at Verdigris Creative Studio has set herself the challenge of altering one coaster per day for the whole year.  She is very ambitious and very dedicated to making this happen.  Anyway over the weekend she sent out a call asking for ideas and asking if anyone wanted to play along.  So I decided I would, not that I intend to make one every day, I might manage one a week if I am not too busy.  So here are the ones I made this weekend to play along with Sue and to give her some ideas.

So this is the first one I did to give Sue an idea


But of course I couldn't leave it at that so I decided to decorate it.  I used a plastic toy zebra that I covered with text paper and altered to match the block then added some wings and bits and pieces.


This next coaster uses chipboard letters that have been gessoed and then drybrushed. I am sure I will find something to decorate this with too, stay posted.


This one is a technique I was playing with that gave me a web like structure on the coaster so of course I had to add a plastic spider, a few branches and a helpless butterfly.


I must thank Sue for the idea.  These little pieces of art are gorgeous and so easy to do.  They can be stand alone pieces or can be incorporated into a bigger work of art. I think I can see more of these in my future.
 
Challenges entered:


Wednesday, July 23, 2014

Artist Trading Block Swap

Here's a little Artist Trading Block I did for a swap I was involved in.


Firstly I embossed cardstock and glued it to the block.  Then using black gesso I painted it and added tissue paper over and around the cardstock.  Once the gesso was dry I drybrushed the embossed areas with copper and gold Lumiere paint.  I used pewter Lumiere paint on the tissued areas.


I then decorated the block using Tim Holtz, Spellbinder and Cheery Lynn dies. 

Side 1


Side 2


Side 3


Side 4


Top

 
I used an old doorknob for the top of the block and wooden beads for the feet.

I am entering this project in the Left of Center Creative Challenge Blog.

Woo hoo this project was chosen to be in the Top 3 for the LOC challenge #37

Sunday, July 20, 2014

Its All About Olley - Imagine If DT project

Welcome to the Imagine If Blog hop. Once again I am blown away by the talent of the ladies on the Design Team.  There are some amazing projects this week so make sure you check out all of the blogs starting with Jo's blog at Imagine If and then following her links to the other blogs or you could jump to Katrina's blog and follow on from there.


The giveaway this week is two new chipboard clock cutouts and a set of keys. All you have to do is enter using the Rafflecopter form shown at the bottom of this post and comment on the blog or facebook.  The more blogs you leave a comment on the more chances you have to win.  Good luck.

My project this week is an altered book I made to showcase photos my new grandson Olley and his family. 


I started with a large hardcover book. I took out the pages and used only the cover.


I cover the front back and spine with white gesso and tissue paper.


I then sprayed the covers using several colours.  When I was happy with the colour I used the Imagine If Twinkle Little Star stencil and randomly added stars using texture paste.


The then layered a picture of Olley on to black card that I tore across the top and then layered Imagine If chipboard around the photos.  I used cogs, arrows, a gorgeous little banner and some of the lovely words that Jo produces.  I just adored the "You stole my heart" words.


I painted all of the chipboard white before adding it to the cover.  I covered the photo with paper towels and began spraying until I was happy with the colour.


I added a few resin bubbles and can tabs but the majority of the layout is made from chipboard.

After I had made the cover Jo said she would like to take it to SENZ so it was a mad rush to get the inside finished in time, but I got there.  The right hand side page is a multi frame cut from chipboard.  I worked out which photo's I wanted to include and then began decorating the frame.  Again I used chipboard from Imagine If and I also filled in some gaps using Cheery Lynn dies and some mesh tape.


Once I had it looking the way I wanted I painted everything with white gesso and then when that had dried I sprayed everything black.


Once the black had dried I sprayed it with coloured paints and then when that had dried I dry brushed it all with gold to highlight the texture.

 
Once everything was dry I added the photos behind the frame and then glued it all to the inside cover of the book.

For the other side of the cover I used paper to colour block the page and then I repeated the process already described. I used an Imagine If frame on the bottom middle photo to highlight the photo and again the rest is a combination of Imagine If chipboard and Cheery Lynn diecuts.


Here is the finished project. I love that because of the book cover this is free standing and does not need a frame. 


I hope you enjoyed this project and encourage you all to give it a try.  It is really very simple and produces a wonderful keepsake.  Please feel free to ask any questions you may have and I will endeavour to answer them for you.  Have a great day and I will see you next week with another project.

a Rafflecopter giveaway