For the latest project for Imagine if I actually finished a project that I had started some time ago and then never finished because I lost my way with it a bit. I had decorated the film strip box but then I had no idea where to go from there. After a lot of thinking I decided to incorporate the film strip box minus the film strip into and old book and then to make it useful I decided to make it into an advent calendar. Here is the finished project.


To begin I found al old book that was big enough to take the height and width of the photo box and one that had a thick enough spine to take the depth of the box. This old ecylopaedia was perfect.


To make the film strip box box I used the MDF photo box from Imagine If. I painted the outside and covered the inside with patterned paper. Inside the box I added various elements including a little chipboard house from Imagine If.
I traced the film strip box onto the front of the cover, then I worked how many pages I would need to glue together for the depth and glued the pages and the front cover together. Then using a very sharp craft knife I cut out the front of the book to make a niche that my shadow box would fit into. I removed enough pages so that I could insert the small frames and then I glued the remaining pages together and to the back of the book.

Once the niche was cut out I glued the shadow box into it. I filled the shadow box with chipboard pieces an dother Christmas bits and pieces.

I then covered the box with a piece of glass from an old photo frame and made a chipboard frame to fit over the glass. This was painted white and then I used some texture paste through a stencil to give it some dimension. I covered the rest of the front and back covers with texture paste spackled to resemble snow and added the Imagine If Merry Christmas embellishment after I had painted it.

I added a piece of white lace to the spine.


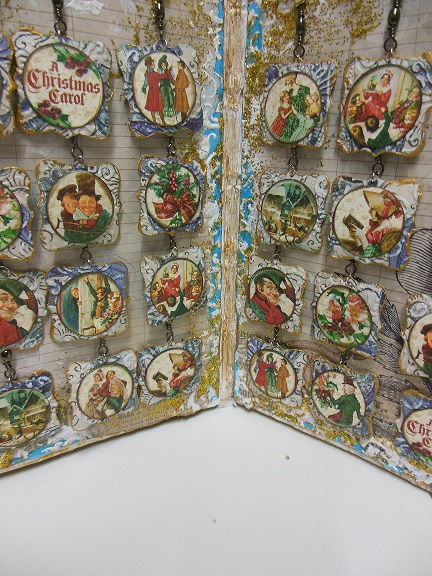
I die cut some little frames from a piece of Kaisercraft paper and glued them to frames diecut from blue cardstock. I then ran them through an embossing folder to give them texture. I cut smaller frames from the same die and diecut some Tim Holtz numbers which I glued to the backs of the frames.


I used another piece of the same paper to make the page backgrounds for the frames. I glued the paper to more blue card, distressed the edges, added some crackle texture paste and some glitter and gold paint to the edges of the two pieces. I cut out small Christmas images from some Graphic 45 paper and glued these to the front of the frames. I assembled the frames using swivels and jump rings and then used split pins to attach them to the pages. The idea of the swivels is so that the frames can be turned each day from the side with the pictures on to the side with the numbers. Here is how the assembled pages look.
Number Side
Picture Side


The beauty of using the old book is that the advent calendar stands nicely on its own and it packs away flat for use year after year. I hope you enjoyed this tutorial and I look forward to bringing you the next project using more great products from Imagine If.
love it Ngaere
ReplyDeleteThank you Carol
DeleteThank you Carol
ReplyDelete