Tuesday, October 27, 2015

A Tale of Three Tags

Today I have a project to share using the fabulous chipboard products from Imagine If .
I have made three tags using pieces from different sets of chipboard which can be found on the Imagine If website or in the store.

Here are the tags:

 
And here is how I made them:
 
Halloween Tag
 
 
Imagine If Chipboard Products Used:

Imagine If Set of cats
Imagine If Halloween Set
Imagine If Bats and the Moon
Imagine If Chipboard Tag
Imagine If Fence
Imagine If Quote Sheet


I began by painting all of the pieces including the tag with black gesso.  I then covered the tag, the cat, the bats, and the gravestones with tissue paper and then painted them again with black gesso.  This gives a bit of texture to the pieces.  Whole they were drying I painted the pumpkin. I painted a piece of book paper with yellow paint and put it behind the pumpkin to give a lighted effect for the eyes, mouth and nose. 

 
 I painted the gravestones with grey paint and a little green to simulate moss on the stones.
The fence I sponged with brown paint.  The tag I painted with blue paint on the top and green on the bottom.  The fancy piece at the top of the tag I painted with gold paint.  Using my Gelli plate I made a print and cut out a circle for the moon.


Once everything was painted I put it all together with the quote.


I added a piece of bush left over from a die cut I used on the Castle tag, gave the cat a lighter chest and belly and some eyes and added some stars and it was done.

Mushroom Tag


Imagine If Chipboard Products Used:
 
Imagine If Large Mushroom with grass
Imagine If Ladybird
Imagine If quote sheet
Imagine If Chipboard Tag


For this tag I painted all of the pieces except for the ladybug bodies with white gesso.  The ladybug bodies I painted with black gesso. I used tissue paper on the body of the tag, the mushroom and the mushroom cap to give texture to the pieces.  I then painted the pieces.


I used some coarse texture gel and paint mixed together for the flowers on the top of the tag and added some crackle texture paste and book paper to the tag.


I then used Brushos to colour the tag.  I sprinkled Lemon, Leaf Green and Orange on to the tag and then I sprayed it with water. I did the same with the quote.
 
 
Then I assembled all of the pieces.


Castle Tag
 
 
Imagine If Chipboard Products Used:
 
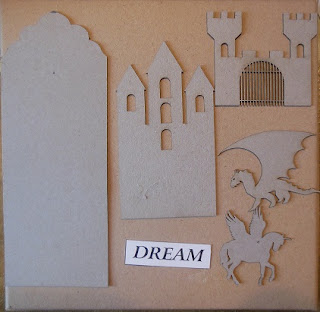
Imagine If Castle
Imagine If Dragon
Imagine If Flying Unicorn
Imagine If Chipboard Tag
Imagine If Quote Sheet


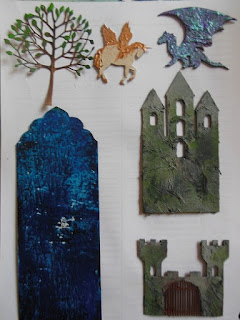
To begin I painted all of the pieces except the Pegasus with black gesso. The Pegasus was painted white. As with the other tags I covered everything except the Pegasus with tissue paper.
 
I then painted all of the pieces.


I added a die cut tree to the wall of the castle and paper behind the windows.  I painted the background dark blue and added a circle for the moon.  I used an Imagine If stencil for the cloud and added some stars to the sky. I coloured the quote and put it all together.
 
 
I am not sure if I will put these on frames or make them into magnets yet but either way they are lovely little keepsakes. I hope you enjoyed this project and I hope it inspires you to create your own projects. 


Thursday, October 22, 2015

Southern Girls Challenge - Stripes

The new challenge over at  Southern Girls Challenge  is Stripes.  For my project I decided to make an altered canvas.


I am trying to use up things in my stash (some call it my hoard) so I decided to recycle a canvas I had lying around and for the cardboard I recycled some empty tissue paper boxes.


I began by covering strips of card with aluminium tape and then I ran them through different embossing folders using my Cuttlebug.


I then painted each stripe with a different colour of acrylic paint.  Once the paint was dry I sanded it back on each stripe.


I painted a 6x6 canvas with black gesso and when that was dry I coloured course texture gel with black paint and covered the front of the canvas.  I then placed my striped over the top of the gel leaving a small gap between each stripe.


I really love the effect. I think it looks pretty cool.  I would be happy to leave it like this but the argument could be made that it  needs a little something....

I covered some silk flower petals and a doily with black Powertex and combined them to make a flower.  Once it was dry I dry brushed the edges of the petals with gold paint.  I glued the flower to an old Christmas ornament I had put away in case I found something to use it on.  I then die cut some circles and flourishes from recycled card covered in aluminium foil. I painted them black then dry brushed them with the same gold paint I used on the flower. I then assembled them on the canvas.


I like the way it has turned out and I hope it has given you some ideas that you can use on a project of your own.  Pop over to the blog Southern Girls Challenge and check out what the rest of the Design Team have done and enter your own project into the challenge.  Until next time, happy crafting.

Wednesday, October 14, 2015

NZ Papercrafters Mega Card Swap #2

For the second Mega card swap over at NZ Papercrafters we were asked to alter the "twos" in the deck.  Here is my finished card.

 
For this card I made the background by pulling a fork through a layer of white gesso then I used crackle texture paste through a stencil for more texture.  I then coloured the background using Brusho Crystal Colour paints.  I then stamped the flowers on to tissue paper and glued them on the background.  I then restamped all of the flowers on to watercolour paper, coloured them with watercolour crayons, cut them out and glued them over the tissue paper flowers.  I did the same with the butterfly. My name and details are under the center of the large flower on the left of the card. This is the card I am keeping and is in fact an Ace because I got the instructions wrong on the first round and now I am catching up.  The ones I am sending out for the actual swap are in fact the "twos".


Tuesday, October 13, 2015

Steampunk Owl Journal

Yay its good to be back on the Imagine If Design Team.  I have been playing with some of the products and here is my first project. A cool art journal using Jo's large chipboard owl.


I began by altering the large chipboard owl. 


I took off his wings and cut out his pupils.  Then using texture past through the gears stencil from Imagine If I covered the entire thing to add depth and texture.  I then painted the whole thing with black gesso.


I took a pair of wings out of the Angel Wings pack and a couple of cogs from the Large Cogs Set and painted them with black paint.


Once the black paint had dried I drybrushed everything using brown and gold acryclic paint.

For the eyes I painted circles gold and glued gear diecuts on the top of the painted circle.  I glued the cogs over the top of the circles and then glued these behind the eye holes.  I painted the pupils black and glued them on to the center of the cogs.  I painted the eyebrow pieces brown and glued them back on around the eyes.  I then filled the eyes with glossy accents to give them some shine.  I took the beak piece and glued small cardboard circles around the edge of the beak,painted it yellow and glued it on to the face.


I took some chipboard letters to spell the word "Art" and glued them to the front of the owl.

I used more diecuts to make the feathers on the chest and glued the new wings on to the body.


Once the owl was finished I found an old book and took the insides out.  I then covered the book with tissue paper and various diecuts which I then painted black.  Once dry I drybrushed the whole thing with Lumiere Pewter paint.  I glued the owl to the front of the cover and then I bound watercolour paper signatures into the cover to complete the journal.


I now have an awesome good sized art journal with 50 pages in it, just waiting to be filled with artistic goodness.  Hope this project helps you to look at things a little differently and to think about changing things up a bit. 

Tuesday, October 6, 2015

Wall Hanging - The MIrror Crack'd

It is time for a new challenge at The Mirror Crack'd.

The theme for this month is Wall Hangings.

If you don't fancy a wall hanging we have a Tic, Tac, Toe board for you to choose from. If you want to do the wall hanging, it's the centre square, then you do NOT need to do the squares either side of it, unless you fancy challenging yourself even further. Or you could pick any of the lines around the outside and miss out the wall hanging altogether. If you use the Tic, Tac, Toe, please tell us in your post which line you have used.


Our host is Lula, and she will be choosing our Winner and Top 5.

We are thrilled to be sponsored by 

With a prize of £12.00 to spend at your favourite Woodware Stockist, either in store or on line.
 
Woodware are a Yorkshire based family owned business, as well as distributing Dreamweaver Stencils and Stampendous Stamps we have a wonderful range of stamps designed for us by Francoise Read and Jane Gill. We also scour the world for new and innovative products for the crafty card maker, and have a great range of punches and tools of the trade, to find stockists in your area or to see the range visit the website www.woodware.co.uk.

Our design team are playing along with the challenge so check out our blog, which is there for inspiration at www.woodware.co.uk/blog.
 
 
I decided to make a wall hanging for this month's challenge.  I have been having a major re-organisation of my craft room and I have come across bits and pieces of projects that I have started and put away to be finished or made into something so I thought now would be a good time to get something put together. I chose not to use the Tic Tac Toe for this challenge because although there were some fabulous options they were all very close to what I normally include in my projects and I wanted to do something a bit different this time.
 
I started with a large chipboard heart from Imagine If NZ.  I covered it with corrugated cardboard  and lace and then I used white crackle paste through a stencil and added a few diecuts.  I then painted everything with white gesso and when that was dry I painted everything with black acrylic paint and while it was still wet I wiped most of the black paint off.
 
Then I came to a standstill, I loved the look but could not figure out where to go from this.


Then I found a tag that I had made in a workshop at SENZ and thought I could incorporate that with the heart to make a wall hanging.
 
 
The chipboard tag was sprayed with ink. The chipboard pieces and flowers were sprayed then embossed with various embossing powders.  Micro beads were added and a bit of copper Viva Gold rubbed on in places.
 
I brought the colours from the tag into the heart using rub-ons and sprays.


I then put it all together:


Then because I thought it needed a little bit more I added a few extra embellishments.


I hope you enjoy this little project and I look forward to seeing your takes on this months challenge entered on the blog.