It seems that time is flying past so quickly and it will be Christmas before we know it. Jo has sent some amazing products from Imagine If for the Design Team to use and over the next couple of months you will get a chance to see the completed projects. But in the meantime I have something a bit simpler for this weeks Design Team Project. I know simple and clean is not something that I do very often but sometimes the products just dictate the project. when Jo initially sent us products she sent some discontinued cardboard packaging with elegant flourishes laser cut into the card. These were too pretty to throw away and hey when do I ever throw anything away?. So I decided to make a simple album that accentuated the flourishes and I also used, quotes, chipboard and felt birds, butterflies and cardstock flourishes. In fact apart from the paper and the binding ring everything else I have used is from Imagine If.
This picture shows the gorgeous corners of the cardboard packaging and here is the rest of the album.
As I said earlier a really simple sweet little album where the pictures will become the stars of the piece.
Sunday, October 19, 2014
Sunday, October 5, 2014
All Buttoned Up
I had a great time with this weeks Design team project for Imagine If. Jo sent us out some beautiful chipboard frames, you can check these out at her online store as well as all of the other gorgeous products she has. So once again I tried something a bit different with the frames and here is the result. Just a quick, fun little project. I am not sure if you would call it a necklace or a collar but I like large statement pieces of jewellery so that is what I made.
I took two of Jo's frames and the piece from the centre of one of the frames. I painted everything with black acrylic paint and then I ran one frame through the cuttlebug using a gears embossing folder.
I then dry brushed the frame with bronze acrylic paint and glued the two frames together.
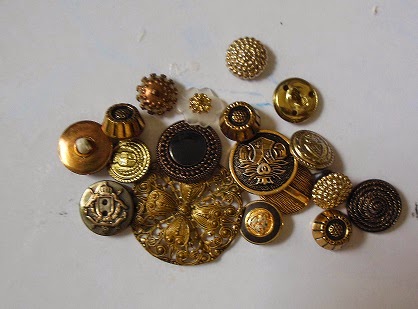
I glued the oval centrepiece into the frame and taking a selection of metal pieces and buttons and glued them on to the oval centre piece, overlapping the front of the frame.
.
I took two of Jo's frames and the piece from the centre of one of the frames. I painted everything with black acrylic paint and then I ran one frame through the cuttlebug using a gears embossing folder.
I then dry brushed the frame with bronze acrylic paint and glued the two frames together.
I glued the oval centrepiece into the frame and taking a selection of metal pieces and buttons and glued them on to the oval centre piece, overlapping the front of the frame.
I used a cute little owl charm for the centre of the piece and some metal flowers I had left over from a workshop . The flowers I glued together with a metal button in the middle and then I glued it to the bottom of the frame. I then added two eyelets to hold the chain, added the chain and my piece was finished. Please check out the Imagine If blog to see what the other Design Team members have come up with you will not be disappointed and hopefully you will be inspired to try your own project.
Thursday, September 25, 2014
Southern Girls Design Team Project - Challenge 97 Shabby/Chic Girly Challenge
Today I am posting my first Design Team Project for Southern Girls Challenge. The theme is Shabby Chic/Girly and I decided to make an altered canvas using the back of the canvas.
I have been playing with small corsets/torsos made from paper mache using a Barbie doll as a mould and I though that this was the perfect challenge to use one of these.
Here is the finished project.
I had a lot of fun making this canvas and I hope it inspires you to enter the challenge over at
Southern Girls Challenge. You can check out the other Design Team Projects and remember anything goes. I am really looking forward to seeing your creations so give it a go.
I have been playing with small corsets/torsos made from paper mache using a Barbie doll as a mould and I though that this was the perfect challenge to use one of these.
Here is the finished project.
I covered the canvas back with bookpaper, then I glued tissue paper over that. I then glued on crochet and paper doilies, cheesecloth and lace. I used chipboard pieces and flowers from Imagine If and I diecut leaves and flowers from wallpaper and old maps and glued it all together. Before adding the flowers I sprayed the canvas using homemade paint sprays in a combination of green, blue, cranberry and violet. I also used a gold shimmer spray over some of the pieces.
I had a lot of fun making this canvas and I hope it inspires you to enter the challenge over at
Southern Girls Challenge. You can check out the other Design Team Projects and remember anything goes. I am really looking forward to seeing your creations so give it a go.
Sunday, September 21, 2014
Imagine if Design Team Project - Nature
This week we have been asked to use some of the Imagine If products and make something with a nature theme. So to begin the hop pop over to Jo's blog where you can find all of the Design team links. Or you can check out Beth's blog from here or follow on to Carol's blog.
For my project this week I wanted to do a canvas using some of the Imagine If chipboard and felt products. I also wanted to use the face stencil that I have used previously as I totally love it and I thought it would lend itself well to the project.
Here is my finished canvas titled "Autumn".
For my project this week I wanted to do a canvas using some of the Imagine If chipboard and felt products. I also wanted to use the face stencil that I have used previously as I totally love it and I thought it would lend itself well to the project.
Here is my finished canvas titled "Autumn".
To begin I covered a canvas with book paper. Then I glued servietttes over the book paper.
I found a calendar page with matching colours and as with my previous project (Stencils) I used the Imagine If face stencil and stencilled the face on the calendar page using texture paste coloured with black acryclic paint. Once the past was dry I cut around the face and glued it to the canvas. I used an Imagine If felt tree, cut off the trunk and glued it to the top of the head.
The next step was to choose some of the gorgeous Imagine If chipboard pieces and colour them using a combination of colourwash sprays and paints in autumn tonings.
I die cut several shadow flowers using the Spellbinders Shadow Flowers die and several branches in different coloured card using an Io die (DIE022-U) which I glued around the back and sides of the face. I then added the trees to the the right of the canvas.

Then it was just a case of building up and adding the felt pieces and feathers, beads and the little lizard at the bottom of the face and the owl on the forehead until I was happy with the overall composition.
I hope you enjoyed this project and I look forward to showcasing another project next week. Please leave a comment if you have any questions regarding this project and go check out the Imagine If site to see their other wonderful products.
Monday, September 15, 2014
Imagine If DT Project - Tags
This week the Imagine If Design Team have been creating using some of the chipboard tags from Imagine If. These are large tags and can be used for a variety of projects as you will see when you check out the Design Team Blogs. If you start at the Imagine If blog you will find the links for the rest of the team.
This week I decided to make a note holder with a little booklet for Post it Notes. The idea is that the notes sit in the little booklet and the holder sticks to the refrigerator using magnets.
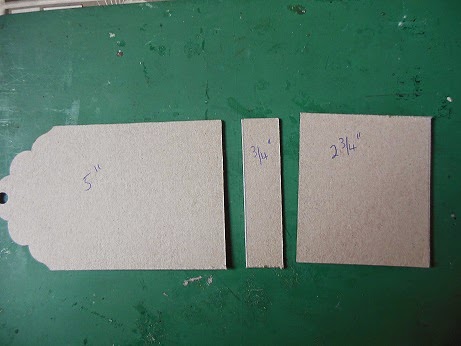
These are two of the tags I used.
I began by cutting the first tag to make the Post it booklet holder. This is the piece that goes on to the refrigerator.
I then glued the pieces on to a piece of patterned paper and finished it off as you would for a book cover, folding over the edges and covering the inside with another piece of paper.
I glued the Post It note pad to piece of cardstock so that once the pad is finished it can be replaced, then I glued the cardstock to the inside of the booklet cover.
Using Imagine If chipboard elements which I inked up using Tim Holtz Distress inks, a button and a coupe of brads I made a closure on the front of the booklet. The top of the tag tucks behind the oval closure.
In order to close the holder and have it hold the booklet I used eyelets up both sides of the holder, which I then treaded with bakers twine. I ran the twine through the holes up the sides across the back and through the hole at the top of the tag. I threaded beads on the to bakers twine and inserted a brad at the front of the holder to wrap the twine around to close the holder. I attached some beads to the bottom of the bakers twine and added some more Imagine If chipboard embellishments to the inside and the front of the holder. I glued magnets to the back of the holder.
To get access to the Post it Note booklet it simply requires that the bakers twine be unwound from the brad and the front folds down allowing the booklet to be removed and replaced back in the same manner. A sweet little project that can made for yourself or to give away as a gift.
Please make sure that you check out the Design Team blogs as there are some stunning ideas and projects using these Imagine If tags.
I hope that this project has inspired you to look at tags in a different light and please leave a comment if you have any questions and I will get back to you.
This week I decided to make a note holder with a little booklet for Post it Notes. The idea is that the notes sit in the little booklet and the holder sticks to the refrigerator using magnets.
These are two of the tags I used.
I began by cutting the first tag to make the Post it booklet holder. This is the piece that goes on to the refrigerator.
I then glued the pieces on to a piece of patterned paper and finished it off as you would for a book cover, folding over the edges and covering the inside with another piece of paper.
I then cut the second tag to make the Post It booklet cover and covered it in the same way.
I glued the Post It note pad to piece of cardstock so that once the pad is finished it can be replaced, then I glued the cardstock to the inside of the booklet cover.
Using Imagine If chipboard elements which I inked up using Tim Holtz Distress inks, a button and a coupe of brads I made a closure on the front of the booklet. The top of the tag tucks behind the oval closure.
In order to close the holder and have it hold the booklet I used eyelets up both sides of the holder, which I then treaded with bakers twine. I ran the twine through the holes up the sides across the back and through the hole at the top of the tag. I threaded beads on the to bakers twine and inserted a brad at the front of the holder to wrap the twine around to close the holder. I attached some beads to the bottom of the bakers twine and added some more Imagine If chipboard embellishments to the inside and the front of the holder. I glued magnets to the back of the holder.
To get access to the Post it Note booklet it simply requires that the bakers twine be unwound from the brad and the front folds down allowing the booklet to be removed and replaced back in the same manner. A sweet little project that can made for yourself or to give away as a gift.
Please make sure that you check out the Design Team blogs as there are some stunning ideas and projects using these Imagine If tags.
I hope that this project has inspired you to look at tags in a different light and please leave a comment if you have any questions and I will get back to you.
Sunday, September 7, 2014
Frame Challenge - Desk Organiser
With our last Design Team parcels Jo sent us out a challenge. She gave us 9 frames that we could do use any way we wanted. Here are the undecorated frames.
which I then painted black. After the black paint I put on a layer of crackle medium and when that was ready I painted the base with caramel acrylic paint.
I did the same to a bunch of toilet roll tubes and the frames themselves.
Using a doily and black paverpol I made the pieces to fit inside the frames which I then joined to make a triangle. I embossed black card to back the triangles.
I glued the toilet tubes and the frames to the base board and then I embellished the centre of the doilies with bottle caps.
I sanded an old placemat and then covered it with puzzle pieces
which I then painted black. After the black paint I put on a layer of crackle medium and when that was ready I painted the base with caramel acrylic paint.
I did the same to a bunch of toilet roll tubes and the frames themselves.
Using a doily and black paverpol I made the pieces to fit inside the frames which I then joined to make a triangle. I embossed black card to back the triangles.
I glued the toilet tubes and the frames to the base board and then I embellished the centre of the doilies with bottle caps.
Hope you like this little project and please follow the blog hop beginning with Lilian to see what the other Design Team members have done with their frames.
Subscribe to:
Posts (Atom)