We begin our blog hop as usual at the Imagine If blog and you can follow the individual blogs from there. Or you can jump back to Lilian's blog to see her altered CD or jump forward to Carol's blog and carry on from there.
Once again there is a giveaway. This week is two of Imagine If's quote sheets of your choice. These are so useful and versatile and can be incorporated into many projects. To enter just use the Rafflecopter entry at the bottom of this post and leave comments on the blogs.
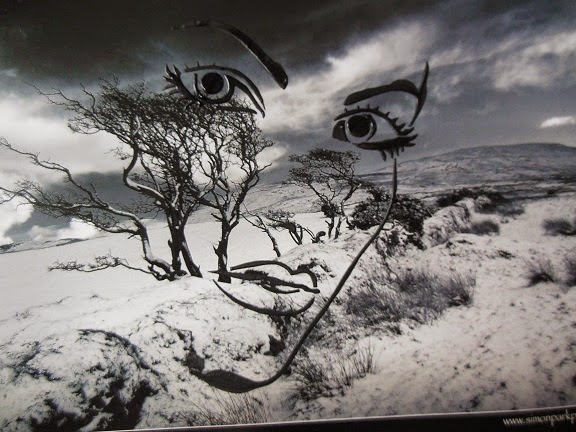
This week I used one of the beautiful face stencils and the bubbles collection from Jo's new range of stencils. Here is the finished project:


So for those of you who are interested here is the process. I am really proud of this as apart from the chipboard this projects is made entirely out of recycled materials, as you will see.
Firstly I sanded a round wooden placemat and then I covered it with book pages, which I then gessoed with white gesso. I then used texture paste through the bubble stencil. This stencil gives a really good clean image but I wanted mine to be a bit "smudged" so I dragged it off rather lifting it cleanly.

I then added black paint to the texture paste and stencilled the woman's face on to a calendar page.
Once it was dry I glued the page to a piece of black card and cut it out on the stencil lines leaving enough at the top and the back of the face to lay my doilies over it.
Once the paste on the placemat had dried I painted it black, dried it with a heat gun becuae I am not the most patient person and when it was dry I swiped over the "bubbles" with an embossing ink pad and sprinkled white holographic embossing powder over the top which I then heated with the heat gun to set it.
I glued the face to the placemat and then I cut up three old crochet doilies and dipped them in black paverpol, if you do not have paverpol then you could use fabric stiffener or even white glue and water will do the trick and once the doily is dry it can be painted black. This picture shows the doily just after it has been dipped in the paverpol so it looks a little grey, but one the paverpol is dry it will become a strong black colour.

I painted two pieces of chipboard from Imagine If, the beautiful flourish and the the muddled clock and then I covered them with the holographic white embossing powder and heat set them. I added them to the project and then used pieces of recycled costume jewellery to "bling" it up a bit. I drybushed a small amount of metallic blue on to the doily and then brushed stickles over the top to give a bit of sparkle. To finish I gave my woman blue eyes and bright red lips as a contrast.
I hope you enjoyed this project and I look forward to bringing you another one next week. Don't forget to check out the blogs and comment and go in the drawer to win this week's prize.
I have entered this project in the Altered Eclectics August Challenge
Rafflecopter: a Rafflecopter giveaway
Love, Love Love!
ReplyDeleteThank you Katrina glad you like it
DeleteSooo creative! amazing use of the doilies and what a fab stencil! This whole project totally ROCKS! xxD
ReplyDeleteThank you Donna, I appreciate your comment, I am a big fan of your work.
Deletevery imaginative work as usual, you are a legend
ReplyDeleteOh shucks Brenda thank you for your kind words, it is lovely to get comments like this from my peers.
DeleteSo amazing. Love the idea of using the paverpol on it. You have such great creativity.
ReplyDeleteThank you Glennis I appreciate your kind comment.
DeleteAll I can say is WOW !!!!!!
ReplyDeleteThank you Sharon I really appreciate you commenting on my project and for the enthusiasm.
DeleteGorjuss! another stunning creation :)
ReplyDeleteThanks Lilian, now if I could combine the techniques with your gorgeous style imagine how stunning that would be.
DeleteAbsolutely fantastic strikingly beautiful but almost a mysterious spookiness about the face also well done.
ReplyDeleteThank you Debbie that is exactly the effect I was going for, glad you noticed it.
DeleteI saw your entry over at Altered Eclectics and had to stop by. First off: Amazeballs! Love this! Second: what is paverpol? And 3rd: thanks for sharing!
ReplyDeleteThank you so much, I am glad you like the project. To answer your question Paverpol is a textile hardener that can be used on fabric and I also use it on paper. If you google Paverpol you will find some amazing projects and information on the product.
DeleteOH MY GOSH!!!! I so love this.... I'm going to have to give it a go!!! Thanks so much for sharing!!
ReplyDeleteI am glad this project inspired you to give it a go Joan. Good luck.
ReplyDelete